 |
one of my kiddos left this on the board on the
last day of school! |
i hope everyone has had a fun and relaxing summer...i know i didn't keep up my promise from my last post in what, march??? ooops.... forgive me?? Well, to make it up to you, i have TONS to share....updates, ideas, DIY projects, and lots of photos!! so get excited, ok? GREAT.
 |
my absolute favorite place to be... seagrove, fl (outside destin)
my family goes every year.
i earned my full week of laying on the beach this year! ;) |
at the beginning of summer i was worried that i was going to run out of things to do...has that happened?? NO. I have kept myself busy and the time has flown by...why is it already the end of july??
- Question: who took a ton of stuff to work on from their classroom at the end of the year, and is just NOW starting to look through it???
that would be.....ME, ME, ME, Me!!!!
when i walked into target about two weeks ago and saw this particular sign....i decided it was time to get busy preparing.... :)
 |
| i mean it is just cruel to children to have this up so early in the summer!!!! |
ok ok...now to the good stuff!
I am so excited to start using the 'daily 5/cafe' program in my classroom this year!!!...one of my favorite things about the daily 5 is the 'i pick' system and 'shopping' for 3 good fit books once a week!! i know that last year some of my kiddos would spend half our reading time searching for a good book....instead of actually reading a good book!!! I wanted my kids to have a separate place to keep their good fit books because i don't know about your kiddos desks....but mine become a black hole after about 2 weeks! ;)
I looked into buying the chair pockets, but they were a little TOO pricey for me. Natrually i headed over to my second home, hobby lobby...and picked out some fun colorful fabric to make my OWN chair pockets, or 'reading bags' in my case.
- They are super easy to make, all you need is....fabric, thick elastic, fabric scissors, ruler/yard stick, pins, and a sewing machine (is faster)/ or needle & thread.
 |
| the fabric!!! (minus the top right...that is for my apt) |
 |
| the elastic i used |
 |
| you need lots and lots of pins!!! |
 |
my new favorite toy!!!!! i learned how to use it
this summer..... |
once you have all your materials...cut your fabric to the size you want them....make sure you have your 2 pieces of fabric 'bright side to bright side'...pin all four corner, and then put your piece of elastic inside of the 2 pieces, about an inch to the top and pin each side of the elastic to the fabric...so it stays in place!! Just like my picture below....
 |
| ready to sew!!! |
make sure you only sew 3 sides together....then turn your bags inside out...ok now...you need to fold the top edges down and iron them so you can stitch the top to look more finished, and so they don't fray!!
 |
| finished bags! |
I hope you could follow my (probably) confusing directions!!
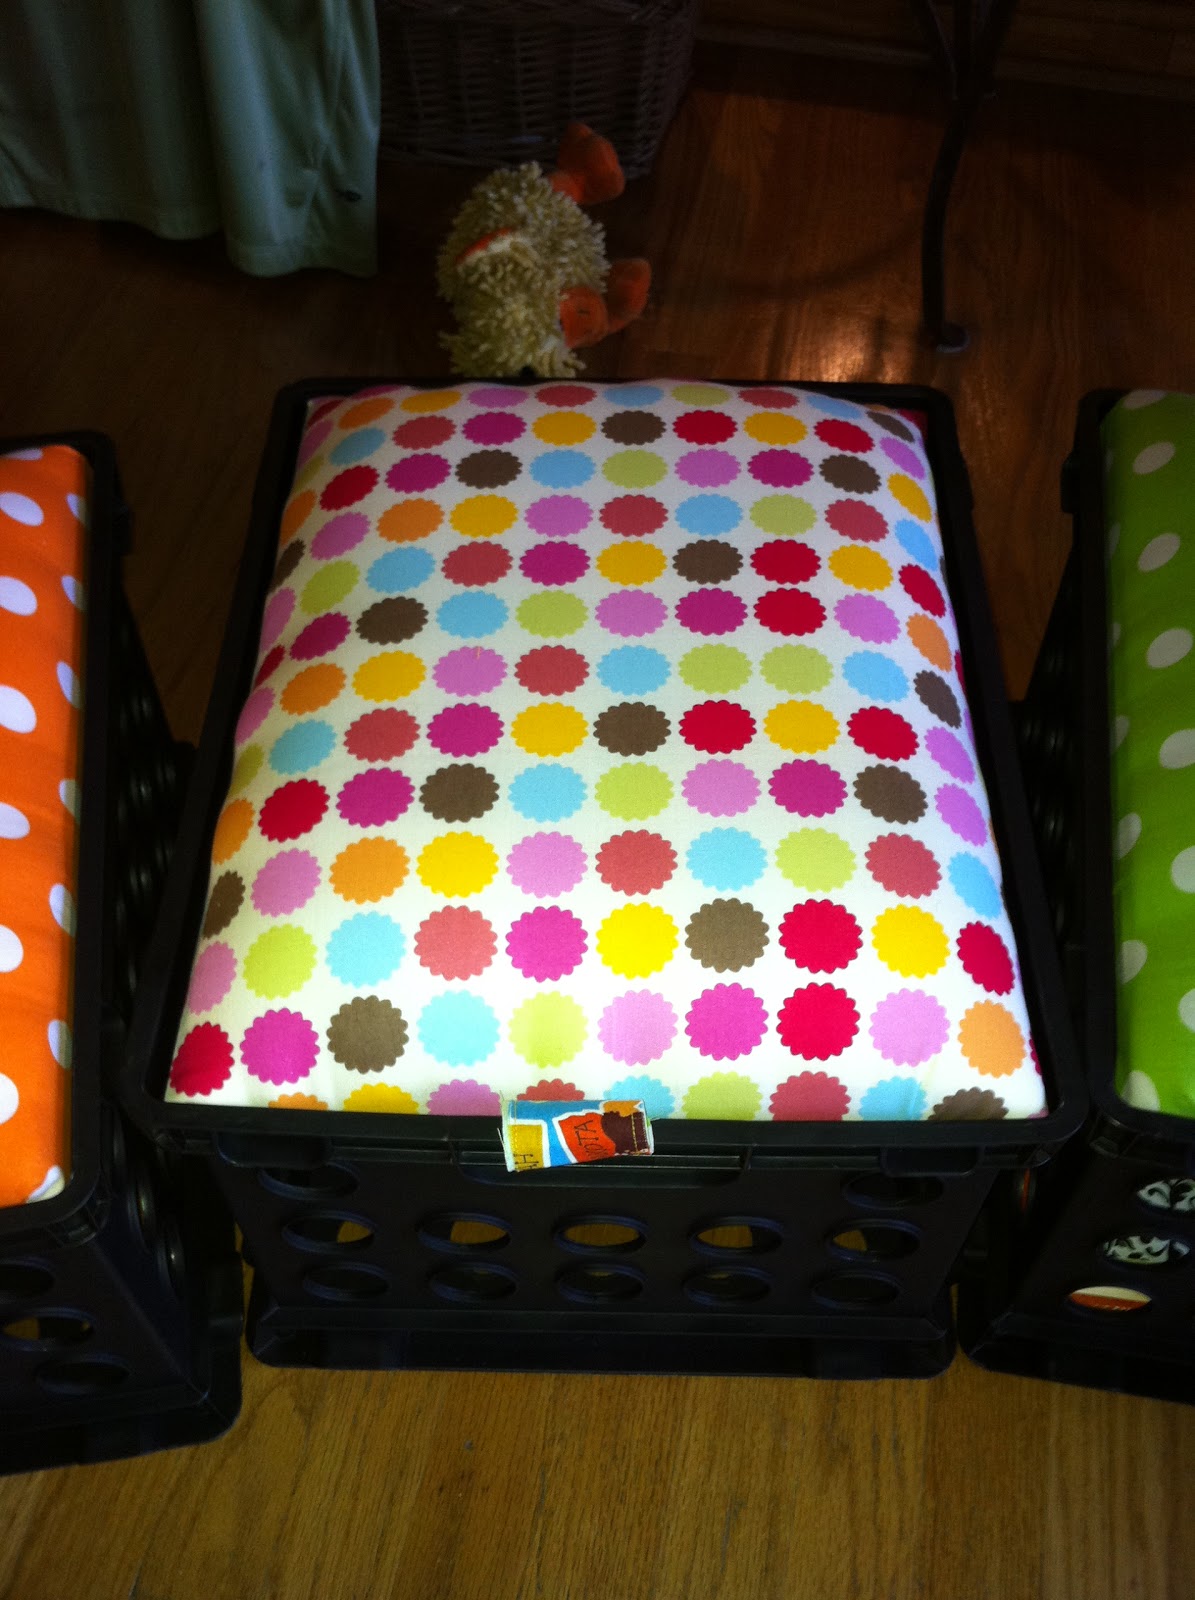
next on the list....i made these adorable 'crate' seats for my small group table (i made 5)....that you can also use as storage! they are SUPER easy to make...
All you need is... crates (i got mine at wal-mart), thick foam (it comes as a roll, i got mine at hobby lobby), plywood to fit in the top of the crate (i got mine at home depot, they cut it for you for FREE), scissors, and a staple gun.
 |
| staple gun & fabric scissors |
 |
| home depot to get the plywood cut ready to be covered! |
 |
cut your fabric about an inch larger than
the plywood! |
 |
cut one piece of the thick foam the same size as the plywood and
a second piece about an inch or so smaller. place the smaller one
on the plywood first, then place the larger piece on top. |
Then you just wrap the fabric around to the back of the plywood (pull very tight) and staple the fabric around the edge of the plywood! I also made small pieces of fabric to use as 'pulls' to staple on the bottom of the plywood. if you use the crate as storage, the pull makes it so much easier to pull the 'seat' up!!.... just like the picture below!
 |
| fabric to use as a 'pull' |
now you've got yourself, your very own, crate seat!!! :)

 |
| all 5! |
I had alot of extra fabric from the reading bags & crate seats so i made pillows for my reading area!! :)
 |
| pillows pillows everywhere |
 |
| front |
 |
| back |
 |
| front |
 |
| back |
I hope you have enjoyed some of my DIY craft projects that i have had fun with this summer...if my quick directions didn't help you, please don't hesitate to email me...sophie.kranz@gmail.com
Also...if you don't already have a pinterest account, you need to get one NOW...and if you do have one feel free to follow my boards (sophie kranz)...i will warn you though....it is soooo addicting!!!!
i'll leave you with this inspiration for the new school year...


love these. i went and bought fabric tonight. do you have a picture of the bags on the chairs? i am worried about the elastic stretching too much and the bags sagging. thanks for the ideas!
ReplyDeletegreat job!! you made SO much out of that fabric and the 5 crates! I bought 2 crates at Staples today for $3 each!!! But I probably won't make the chairs, just because I don't think my high schoolers will take them seriously! :)
ReplyDeleteI'm so envious. I am the worst a sewing and I love your crate chairs and pillows. Soooo cute. I just found your blog today and I love it. I am now a follower. Come share with me!
ReplyDelete-Lauren
www.weeklyhive.blogspot.com
I made a rolling crate chair this year. Instead of stapling the material I bought colored duct tape and taped the material to the bottom side. It held up great!!
DeleteI love your crate seats!! I've been scouring the web looking for pics of these. I have to make some now! Great job!
ReplyDeleteYou are super crafty! I'm teaching second this year and I'm worried about my heavier students sitting on the crate seats and getting embarrased if they break or anything. Did they come out pretty sturdy?
ReplyDeletemysecondgradejournal.blogspot.com
Mrs. Arens- I am so glad i inspired you to make the chair bags!! unfortunately, i don't have a picture of the bags on a chair, but i am pretty sure i cut each piece of elastic to be 11 1/2 in. long! I hope this helps!!
ReplyDeleteMrs. Shepherd- the seats came out pretty sturdy...i had all my family members sit on the crates as well as myself....and they didn't break or feel like it was going to break!! and the kiddos are only 7-8 years old, so i think they should be fine!
Love the polka dot fabric! I have that in scrapbook paper that I used to cover my light switch plates and my outlet covers!!! I'd love that for my office space so it'd match! :D I thought about getting that fabric for some of the curtains.
ReplyDeleteSo cute! I'm lovin' that fabric for sure!
ReplyDelete=Rachelle
whattheteacherwants.blogspot.com
LOVE THIS IDEA!!!!! I am just wondering if I could take mgt or parents in fronting the crates! I think I could manage the rest. It would be a great piece for each child to take home after the end of the year! Thankz!
ReplyDeleteOKAY! I love the crates idea especially for small group learning time. I'm a preschool teacher and I think these would be perfect for our kiddos. Is there a lip inside the crate that the plywood rests on? One question about the chair back bags: what keeps them from sliding off the back once they have supplies in them?
ReplyDeleteThanks!
I love the crate seats! What size do you get the plywood cut into? Thank you for posting!
ReplyDeleteI love this idea! Thank you for sharing!
ReplyDeleteHow sturdy are these? Do they collapse when people sit on them ever? or are they relatively strong?
ReplyDeleteIs the plywood cut so it sits INSIDE the crate? Or on top of the crate? I'm thinking they would slide off they were cut to fit on top...
ReplyDeleteDo you know what thickness the foam is? I was not sure which to get. I also wondered if the plywood was cut to fit inside the rim or sit on top.
ReplyDeleteThank you for sharing these ideas. I am getting ready for next year and came across these great projects. I had a question about the chair bags. I couldn't see how the elastic was sewn in. Does it go all the way around the bag or just one side? I was also wondering how they stay on the chairs with stuff in them. Would it work to put little velcro straps on to help them stay?
ReplyDeleteI'm going to try this. Did you connect the crate to the cushion or do do you just sit it on top of the crate?. I'm your newest follower. Please visit my blog at Calling Plays in 2nd Grade.
ReplyDeleteLove these! I am also curious about the size of the plywood compared to the size of the crate. It looks like it fits into the crate. Does your crate have a lip to hold it? Thanks
ReplyDeleteHi there! I am a new follower! Love your stuff! I am a certified teacher looking for a job. In the mean time, I love making all these cute things for the one day classroom. Great ideas! Check me out at seaoflearning.blogspot.com
ReplyDeleteSeen these in so many blogs, BUT loved how you explained how to make them...pictures are great and LOVE, Love the pull tabs as well. I am new to blogging. You are one of my first to follow. Please check out my new blog at superteachertactics.blogspot.com
ReplyDeleteI found your blog through this great pinterest post. I am your newest follower and I am awarding several of the new blogs I am following with the Versatile Blogger award! Swing by my blog to check it out! I look forward to seeing all of your great ideas!
ReplyDeleteAllison
Miss Allison's Class
I love the crates!! Going to make some for my preschool class! Could you share the measurements for the Plywood??
ReplyDeleteBring your crate into Home Depot. They will measure and cut to fit. Buy the crates that are for hanging file folders... They have a "lip" where the wood will sit.
ReplyDeleteLove it! I am doing this today.
ReplyDeleteI just found your site and am making your seats today. I am your newest follower from the blog hop and have given you an award! You can come pick it up here http://applefortheteach.blogspot.com/2012/07/versatile-blogger-award.html
ReplyDeleteI am just curious, but how many seats can you make with a sheet of plywood?
ReplyDeleteHi! I am a new follower through the hop and I have nominated you for the One Lovely Blog award! Come to my blog and check it out!
ReplyDeleteLesa-s.blogspot.com
thanks for this post, I have seen pics of the crates everywhere but this is the first post I have found on how to actually make them! I can't wait to do it! I love your blog look...it is so unique. I am a new blogger and your newest follower. Come visit me, I would love for you to follow my blog:)
ReplyDelete~Rachel
Teaching with Z
Just happened across your blog and wanted to let you know that there is no such word as "alot". There is "a lot" which means much or an abundance, and there is "allot" which means to portion out or divide. I thought it might have been a typo in this post, but I noticed it on several posts, so I didn't want to pass up the opportunity to share some knowledge. Other than that, I am enjoying your blog.
ReplyDeleteOMG seriously??? How rude!
DeleteHi Sophie! I am one of your newest followers. Love the crate seats! Made them today! I mentioned you in my blog post about how I made them! Feel free to stop by and check it out at thealyssadiaries.com! Thanks for all of your posts! You are truly very crafty I'm jealous!
ReplyDeleteThank you for explaining how to make the crate seats, I love them!!
ReplyDeleteThis comment has been removed by the author.
ReplyDeleteI have the same question as a previous poster I haven't seen an answer for yet--does the seat have to rest on anything inside the crate? I just don't see how it wouldn't fall into the crate if it was cut to size.
ReplyDeletethe plywood sits on the "lip" "ledge" on the inside of the crate
DeleteYou are BRILLIANT!!!! I have been looking for kid-sized seating for my family room and this is PERFECT. THANK YOU for sharing such a fabulous and frugal idea!
ReplyDeleteBlessings!
Jennifer
{www.agelementary.blogspot.com}
Thanks so much for this tutorial! I now have cute little storage seats at my kidney table. And the kids love them!
ReplyDelete~Lindsay
Mrs. Miller’s Monkey Business
Hello, Neat post. There's a problem together with your site in internet explorer, would test this? IE nonetheless is the marketplace chief and a good portion of folks will miss your magnificent writing due to this problem.
ReplyDeleteFeel free to surf to my weblog ... legal amphetamines
It's actually very complicated in this active life to listen news on TV, therefore I just use world wide web for that purpose, and obtain the hottest news.
ReplyDeleteHere is my blog :: drain cleaning fulham
Heya thіs is kind of οf off toρic but Ι was wanting tо know if blogs use WҮSIWҮG eԁitогs or if you have
ReplyDeleteto manually code with HTML. I'm starting a blog soon but have no coding skills so I wanted to get advice from someone with experience. Any help would be enormously appreciated!
my web blog; herbal highs smoke for pain ()
LOVE it! Just wanted you to know that your milk crate seats were featured on our site today: http://www.thedatingdivas.com/food/101-camping-tips-ideas/ Thanks so much for sharing!!! XOXO, The Dating Divas
ReplyDeleteLove the seat pockets. I want to make them myself and was curious how much fabric you used for each pocket?
ReplyDeleteIf anyone is worried about the crates collapsing because of the weight of some students, then go to your local grocery store and ask if they would donate any milk crates (those are the best ones). Also, instead of attaching the cushion over the opening of the crate then just turn it on its side. On the open side you can slide in a fabric basket that pops open for storage. Best of luck! Teacher from Miami.
ReplyDeleteIf anyone is worried about the crates collapsing because of the weight of some students, then go to your local grocery store and ask if they would donate any milk crates (those are the best ones). Also, instead of attaching the cushion over the opening of the crate then just turn it on its side. On the open side you can slide in a fabric basket that pops open for storage. Best of luck! Teacher from Miami.
ReplyDeleteAwesome chairs
ReplyDeleteAmazing chairs!!!
ReplyDeleteYou should really make more and sell them in sets of 12 on ebay. I promise to be your first customer!!!